PostgreSQL supports LDAP authentication and can be used on both Linux and Windows. You can use an LDAP server to authenticate users, but you must first create a role for the database server.
ldap2pg allows users registered with the LDAP server to be synchronized with Fujitsu Enterprise Postgres roles, so that the above database server roles can be created automatically. This allows you to centrally manage roles on the LDAP server. Note that ldap2pg only supports Linux.
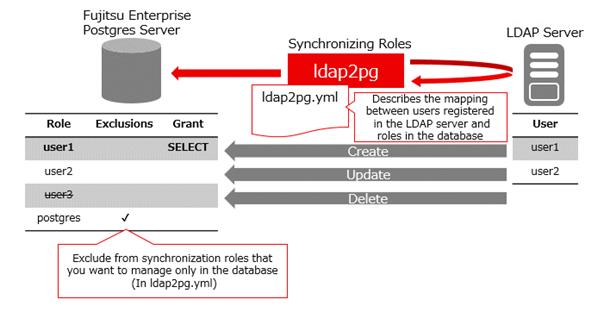
Users registered with the LDAP server and Fujitsu Enterprise Postgres roles are synchronized when the ldap2pg command is executed, based on the ldap2pg.yml that defines these mappings. If a role defined in ldap2pg.yml does not exist in Fujitsu Enterprise Postgres, it is created, and any roles not defined in ldap2pg.yml are removed. Roles that would be difficult to update or delete, such as database administrator roles that do not work with LDAP servers, can be excluded from synchronization by setting them to ldap2pg.yml.
The key points of operation are explained below.
Timing of Synchronization
Synchronize when the LDAP server user changes so that the database server is always up to date. Therefore, you must synchronize periodically to automatically propagate the LDAP server information, or manually propagate it as the LDAP server changes.
If you synchronize periodically, ensure that the synchronization interval is an acceptable time lag before LDAP server changes are propagated to the database server. This is because, even when fully synchronized, ldap2pg accesses the LDAP server and database to check for changes. For example, run the ldap2pg command periodically every 5 minutes or so.
If you use cron, for example, to run automatically on a regular basis, you should log the standard output and standard error output of ldap2pg using settings or redirects such as cron. You can check the log to see if ldap2pg was interrupted or if an unexpected role was removed.
If you want to synchronize immediately or if you want to control the synchronization timing yourself, synchronize manually.
Enhanced Security in Combination with Confidentiality Management
ldap2pg can also manage database privileges, but it cannot manage granular units such as tables and rowsets. Combined with the confidentiality management, which allows such configuration and allows auditing of privilege settings, it provides robust security measures.
For the settings for using ldap2pg in combination with the confidentiality management, refer to "4.2.2.4 Configuration with Confidentiality Management".
Install ldap2pg
Install ldap2pg using the client program DVD.
Set the environment variable PATH for ldap2pg.
$ export PATH=/opt/fsepv<x>ldap2pg/bin:$PATH
Define a database role on the database server that has superuser privileges as the executor of ldap2pg. For more information about defining roles, refer to "CREATE ROLE" in "Reference" in the PostgreSQL Documentation for information on the CREATE ROLE.
Perform ldap2pg setup.
Refer to "Configuration" or "Cookbook" in the ldap2pg document (https://ldap2pg.readthedocs.io/en/latest/) for details.
Set roles that are defined and used only by the database, such as database administrators not managed by an LDAP server, or roles that exclude synchronization, as defined by Fujitsu Enterprise Postgres.
Add the settings to roles_blacklist_query in the ldap2pg.yml file.
pgx_update_profile_status, and roles that inherit from pgx_update_profile_status (Role for streaming replication of the Policy-based Login Security)
pgx_cgroup_role_* (Confidentiality role for the confidentiality management)
When the Database Server is redundant
In a database redundancy environment, specify "primary" for the target_session_attrs parameter. You can also specify "read-write".
If you have set ldap2pg to run periodically, unset it.
Uninstall ldap2pg. Refer to "3.3 Uninstallation" for more information.
If you have defined a role on the database server specifically for running ldap2pg, remove that role.
Describes how to use ldap2pg to synchronize users of an LDAP server with a database server as database roles.
Edit the ldap2pg.yml file, for example if you want to grant access to a role that synchronizes with an LDAP user. For information on ldap2pg.yml, refer to the following document:
https://ldap2pg.readthedocs.io/en/latest/config/
Use environment variables to specify information about the connection destination to the LDAP server or database.
https://ldap2pg.readthedocs.io/en/latest/cli/#environment-variables
The user who connects to the database server must be the user created during the setup procedure. Connections to LDAP servers support LDAP-initiated environment variables and ldaprc files, while database access supports PG-initiated environment variables available in libpq. These environment variables are used to configure the connection.
Run ldap2pg with the check option to verify that the role being modified matches the role being modified.
Run ldap2pg with the --real option to synchronize roles with the database server.
Configure LDAP server users and database roles to synchronize periodically after the initial synchronization.
Prepare the script that sets the environment variables and the script that synchronizes the roles that you performed in steps 2 and 4, and register the script in the cron job so that the script that synchronizes the roles references the environment variables and synchronizes the roles.
SHELL=/bin/bash
*/5 * * * * source /home/postgres/env.sh && . /home/postgres/sample.sh >> /home/postgres/sample.log 2>&1
It combines ldap2pg with confidentiality management to provide detailed access control. There is overlap between the role management capabilities of ldap2pg and the confidentiality management. When used in combination, use ldap2pg and confidentiality management to separate role management:
Feature | Role Management Segregation |
|---|---|
ldap2pg | Add, remove, and managing role membership |
Confidentiality Management | Set role attributes, grant and revoke privileges, and audit them |
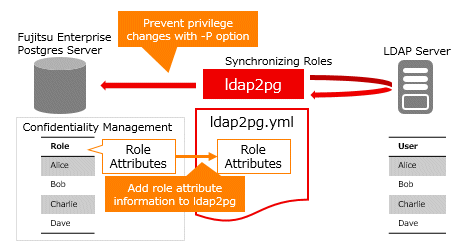
To separate role management between ldap2pg and confidentiality management, do the following:
Add attribute information for confidentiality management roles to the ldap2pg configuration file (ldap2pg.yml) so that the attributes of roles set for confidentiality management are not updated by running ldap2pg
Run ldap2pg with the -P option to prevent deletion of confidentiality groups and role relationships in the confidentiality management when ldap2pg is run.
The configuration flow for ldap2pg combined with the confidentiality management is as follows.
Introduction
Configure the necessary settings to run ldap2pg as described in the following procedure.
Design user-role mappings on the LDAP server to create a list of roles that should be managed by the confidentiality management.
To create an yml file:
Specify the settings for retrieving and synchronizing the listed objects from the LDAP server.
Write a confidentiality management role starting with pgx_cgroup_role_ in roles_blacklist_query.
Ensure that the grant and revoke privileges settings are not listed in the yml file.
Stop synchronization if it is already running using ldap2pg.
Create a role as described in "4.2.2.3 Using ldap2pg to Synchronize Database Roles".
Refer to "Confidentiality Management" in the "Security Operations Guide" and perform all necessary tasks.
During this process, all the roles in the list of roles are registered in the confidentiality groups of the confidentiality management.
Modify the yml file so that ldap2pg does not update the attributes of the roles you have confidentiality management. Refer to "Settings When You Change the Attributes or Privileges of a role in a Confidentiality Groups" for a sample script that prints an yml file.
If you have already done regular synchronization using ldap2pg, try again.
Operation
Use the following procedure to manipulate roles according to your situation.
Creates a confidentiality management confidentiality groups.
Run ldap2pg with the -P option to create the LDAP server user as a database role.
Add the role you added above to the confidentiality groups.
Reflect the confidentiality management configuration in ldap2pg.yml, referring to the "Example of Applying Role Attributes".
Use the following example to execute SQL and retrieve the settings for each role:
For all roles, this example retrieves the LOGIN attribute, the role attributes of the confidentiality management, and the membership of the confidentiality management role. If you want to change the settings to suit your environment, rewrite the SQL, such as modifying the 'LOGIN' part of the SQL Execution Example, or modify the Example of Run Results directly.
SELECT '- name: ' ||pgxgr.name || chr(10) || '  options: ' || pgxgr.opt || chr(10) ||  '  parent: ' || chr(10) || '    - '  || string_agg(pgxgr.cgrorolename, chr(10) || '    - ')
FROM  (SELECT pgxg.cgrorolename,
        concat_ws(' ',
        'LOGIN',
        CASE pgxg.cgrosuperuser WHEN true THEN 'SUPERUSER' END,
        CASE pgxg.cgrocreatedb WHEN true THEN 'CREATEDB' END,
        CASE pgxg.cgrocreaterole WHEN true THEN 'CREATEROLE' END,
        CASE pgxg.cgroreplication WHEN true THEN 'REPLICATION' END,
        CASE pgxg.cgrobypassrls WHEN true THEN 'BYPASSRLS' END) AS opt,
        pgxroles.name
      FROM pgx_confidential_group pgxg,
      (SELECT pgxr.crolmatid as matid, pgxr.crolgroid as groid,  pgxr.crolname AS name FROM pgx_confidential_role pgxr ) as pgxroles
      WHERE pgxg.cgromatid = pgxroles.matid and pgxg.cgroid = pgxroles.groid) pgxgr
GROUP BY pgxgr.name, pgxgr.opt;- name: alice
options: LOGIN CREATEDB
parent:
- pgx_cgroup_role_000000000000000001
- name: bob
options: LOGIN CREATEDB
parent:
-pgx_cgroup_role_000000000000000001
- name: charlie
options: LOGIN CREATEDB CREATEROLE
parent:
- pgx_cgroup_role_000000000000000002
- name: dave
options: LOGIN CREATEDB CREATEROLE
parent:
- pgx_cgroup_role_000000000000000002Put the setting of roles at the top of the rules in ldap2pg.yml based on the information in the above settings. If it is not at the top, the configuration information that synchronizes with the LDAP server takes effect, and the confidentiality management configuration does not take effect.
Confidentiality management modifies role attributes and privileges information.
Create a script to retrieve the confidentiality management configuration information and register it in a cron job so that the changed information is automatically reflected in the yml file.
The following is an example shell script:.
Please change the settings to suit your environment.
The shell script shown here consists of two configuration files, ldap2pg_pre.yml and ldap2pg_after.yml, and the confidentiality management configuration information (In the sample, it is output to confidential_roles.yml) that is reflected in yml. Combine these three files to create the ldap2pg.yml file.
ldap2pg_pre.yml is the information to be placed before the confidentiality management configuration information in ldap2pg.yml, and contains the postgres section and up to "roles:" in the rules section. ldap2pg_after.yml is information to be placed after tthe confidentiality management configuration information in ldap2pg.yml, and contains information about roles not managed by the confidentiality management.
ldap2pg_pre.yml : Provides information about the postgres section
version: 6

#
#       1.   P O S T G R E S   I N S P E C T I O N
#
#  See https://ldap2pg.readthedocs.io/en/latest/postgres/
#
postgres:
# Exclude roles starting with postgres, pg that PostgreSQL uses internally
  roles_blacklist_query: [postgres, pg_*, pgx_update_profile_status, pgx_cgroup_role* ]
  databases_query: [postgres]
(Omitted)
rules:
- description: "Setup static roles and grants."
  roles:
ldap2pg_after.yml : Provides information about roles that are not part of the confidentiality groups
  - names:
    - readers
    options: NOLOGIN
  - name: writers
    # Grant reading to writers
    parent: [readers]
    options: NOLOGIN
(Omitted)
sample.sh : A script that outputs information about confidentiality groups to confidential_roles.yml and combines them into a single yml file
#!/bin/bash

psql -h localhost -p 27500 -d postgres -U postgres -A -t <<EOF > /home/postgres/confidential_roles.yml
SELECT '  - name: ' ||pgxgr.name || chr(10) || '    options: ' || pgxgr.opt || chr(10) ||  '    parent: ' || chr(10) || '    - '  || string_agg(pgxgr.cgrorolename, chr(10) || '    - ')
FROM  (SELECT pgxg.cgrorolename,
        concat_ws(' ',
        'LOGIN',
        CASE pgxg.cgrosuperuser WHEN true THEN 'SUPERUSER' END,
        CASE pgxg.cgrocreatedb WHEN true THEN 'CREATEDB' END,
        CASE pgxg.cgrocreaterole WHEN true THEN 'CREATEROLE' END,
        CASE pgxg.cgroreplication WHEN true THEN 'REPLICATION' END,
        CASE pgxg.cgrobypassrls WHEN true THEN 'BYPASSRLS' END) AS opt,
        pgxroles.name
      FROM pgx_confidential_group pgxg,
      (SELECT pgxr.crolmatid as matid, pgxr.crolgroid as groid,  pgxr.crolname AS name FROM
pgx_confidential_role pgxr ) as pgxroles
      WHERE pgxg.cgromatid = pgxroles.matid and pgxg.cgroid = pgxroles.groid) pgxgr
GROUP BY pgxgr.name, pgxgr.opt;
EOF
cat /home/postgres/ldap2pg_pre.yml /home/postgres/confidential_roles.yml /home/postgres/ldap2pg_after.yml > /home/postgres/ldap2pg.yml

#Run  ldap2pg -P -c ldap2pg.yml to update retrieved role information
Information
If you want to manually apply the attribute or privilege information of a role that has been changed in confidentiality management to ldap2pg.yml, obtain the change information and apply it to ldap2pg.yml, referring to "Example of Applying Role Attributes".
Create a role to add to the confidentiality groups in ldap2pg.
Add the database role you created in step 1 to the existing confidentiality groups.
Reflect the newly added role's confidentiality management settings in ldap2pg.yml, as shown in "Example of Applying Role Attributes".
Information
If cron automatically reflects changes to the confidentiality groups in ldap2pg.yml, stop cron and add the newly added database role to the confidentiality groups.
Remove the role you want to remove from the confidentiality groups.
Reflect changes to confidentiality management in ldap2pg.yml, referring to "Example of Applying Role Attributes".
Execute ldap2pg with the -P option to reflect.
Point
If you deleted the confidentiality matrix and the confidentiality groups, perform steps 2 and 3 above.
See
If you accidentally delete a role managed by confidentiality management using the ldap2pg, refer to "How to Check Confidentiality Objects and Roles" in the Security Operation Guide to recover the role managed by confidentiality management.
If you accidentally delete the confidentiality role in ldap2pg, refer to "Creating a Confidentiality Management Role" in the Security Operations Guide to recover.
The following table lists server that ldap2pg can connected to.
OS | Product name |
|---|---|
Linux |
|